Which battery should I use?

As with speakers, I’m often asked what the best battery to use with my proton pack kit is.

The proton pack kit requires around 12V to function.  A little less, or a little more is okay, with a 14.4V battery pack being the absolute recommended maximum.  (The true maximum is actually a bit higher than this, but a 14.4V lithium pack won’t exceed that.)

Is there any advantage to more voltage?  Well, not really.  The gain on the amplifier is set such that over 12V the audio will begin clipping, so while it might sound a bit louder the audio quality will be somewhat reduced.  So for that reason, I recommend a 12V battery pack.  I designed the kit for 12V because 12V battery packs are extremely common, while higher voltage packs are more expensive and hard to come by.   And the e-cig foggers that Fincher & Son sell for use with my kits are also designed to run at 12V and higher voltages will likely damage them.  So for everyone’s sanity, stick to 12V.

Now there’s a lot of options available for a 12V supply, but the most common are lithium-ion aka “lipo”, alkaline, or lead acid.

The disadvantages of alkaline and lead acid are that they’re extremely heavy.  Alkaline also has a high internal resistance which means the voltage droops when the amplifier in the kit tries to draw a lot of current.  This kills the bass.  And of course you can’t recharge alkaline, so C cells will last you a few hours, and D cells a couple days and then you have to replace them.  And the voltage also drops as they discharge so the pack will get quieter over time.  And lead acid, well because they’re so heavy I don’t recommend them at all, but they can source plenty of current and have high capacities.  You’re on your own finding a charging solution if you choose that route, but it shouldn’t be too hard to get a charger since you can find them on the shelf at any auto parts store or Walmart.

So the battery I recommend for use with the packs is lithium-ion.  Li-ion batteries have high capacities, can source large amounts of current, are very lightweight, and can be recharged easily; if you get the right li-ion battery pack.

Now, you may have heard of lipo batteries for remote control vehicles, and those are fine, but as they’re designed to supply huge amounts of current far in excess of what my kit requires, they can be a pain to charge and maintain.  They have no built in protection circuits for overcharging or over discharging, and either of those can be dangerous and either cause a fire, or kill the battery.

So I recommend you stay away from those, and instead look at what are known as power banks.  Power banks are often used for charging cellphones, or powering laptops and cctv cameras.   The ones for laptops and CCTV cameras are the sort you’re looking for, because they’ve got a 12V output with a 5.5×2.1mm barrel jack on them, and they are capable of sourcing 2-3A continuously, which is the minimum required for the kit.

Power banks vary widely in capacity and price though.  You will want one that’s at least 6000mAh for the proton pack kit, though 3600mAh or 4800mAh may be sufficient for many.  6000mAh will give you 1A on average for 6 hours, or 500mA for 12 hours.  The average current draw of the kit is going to be closer to the latter, though how much it actually draws depends on if it’s playing music and how loud it is, which also depends on if you’re running with one or two speakers; so it’s impossible to provide you with an exact number.  But with a 6000mAh battery, you should be fine all day at a con, and you can charge it in 6 hours overnight.

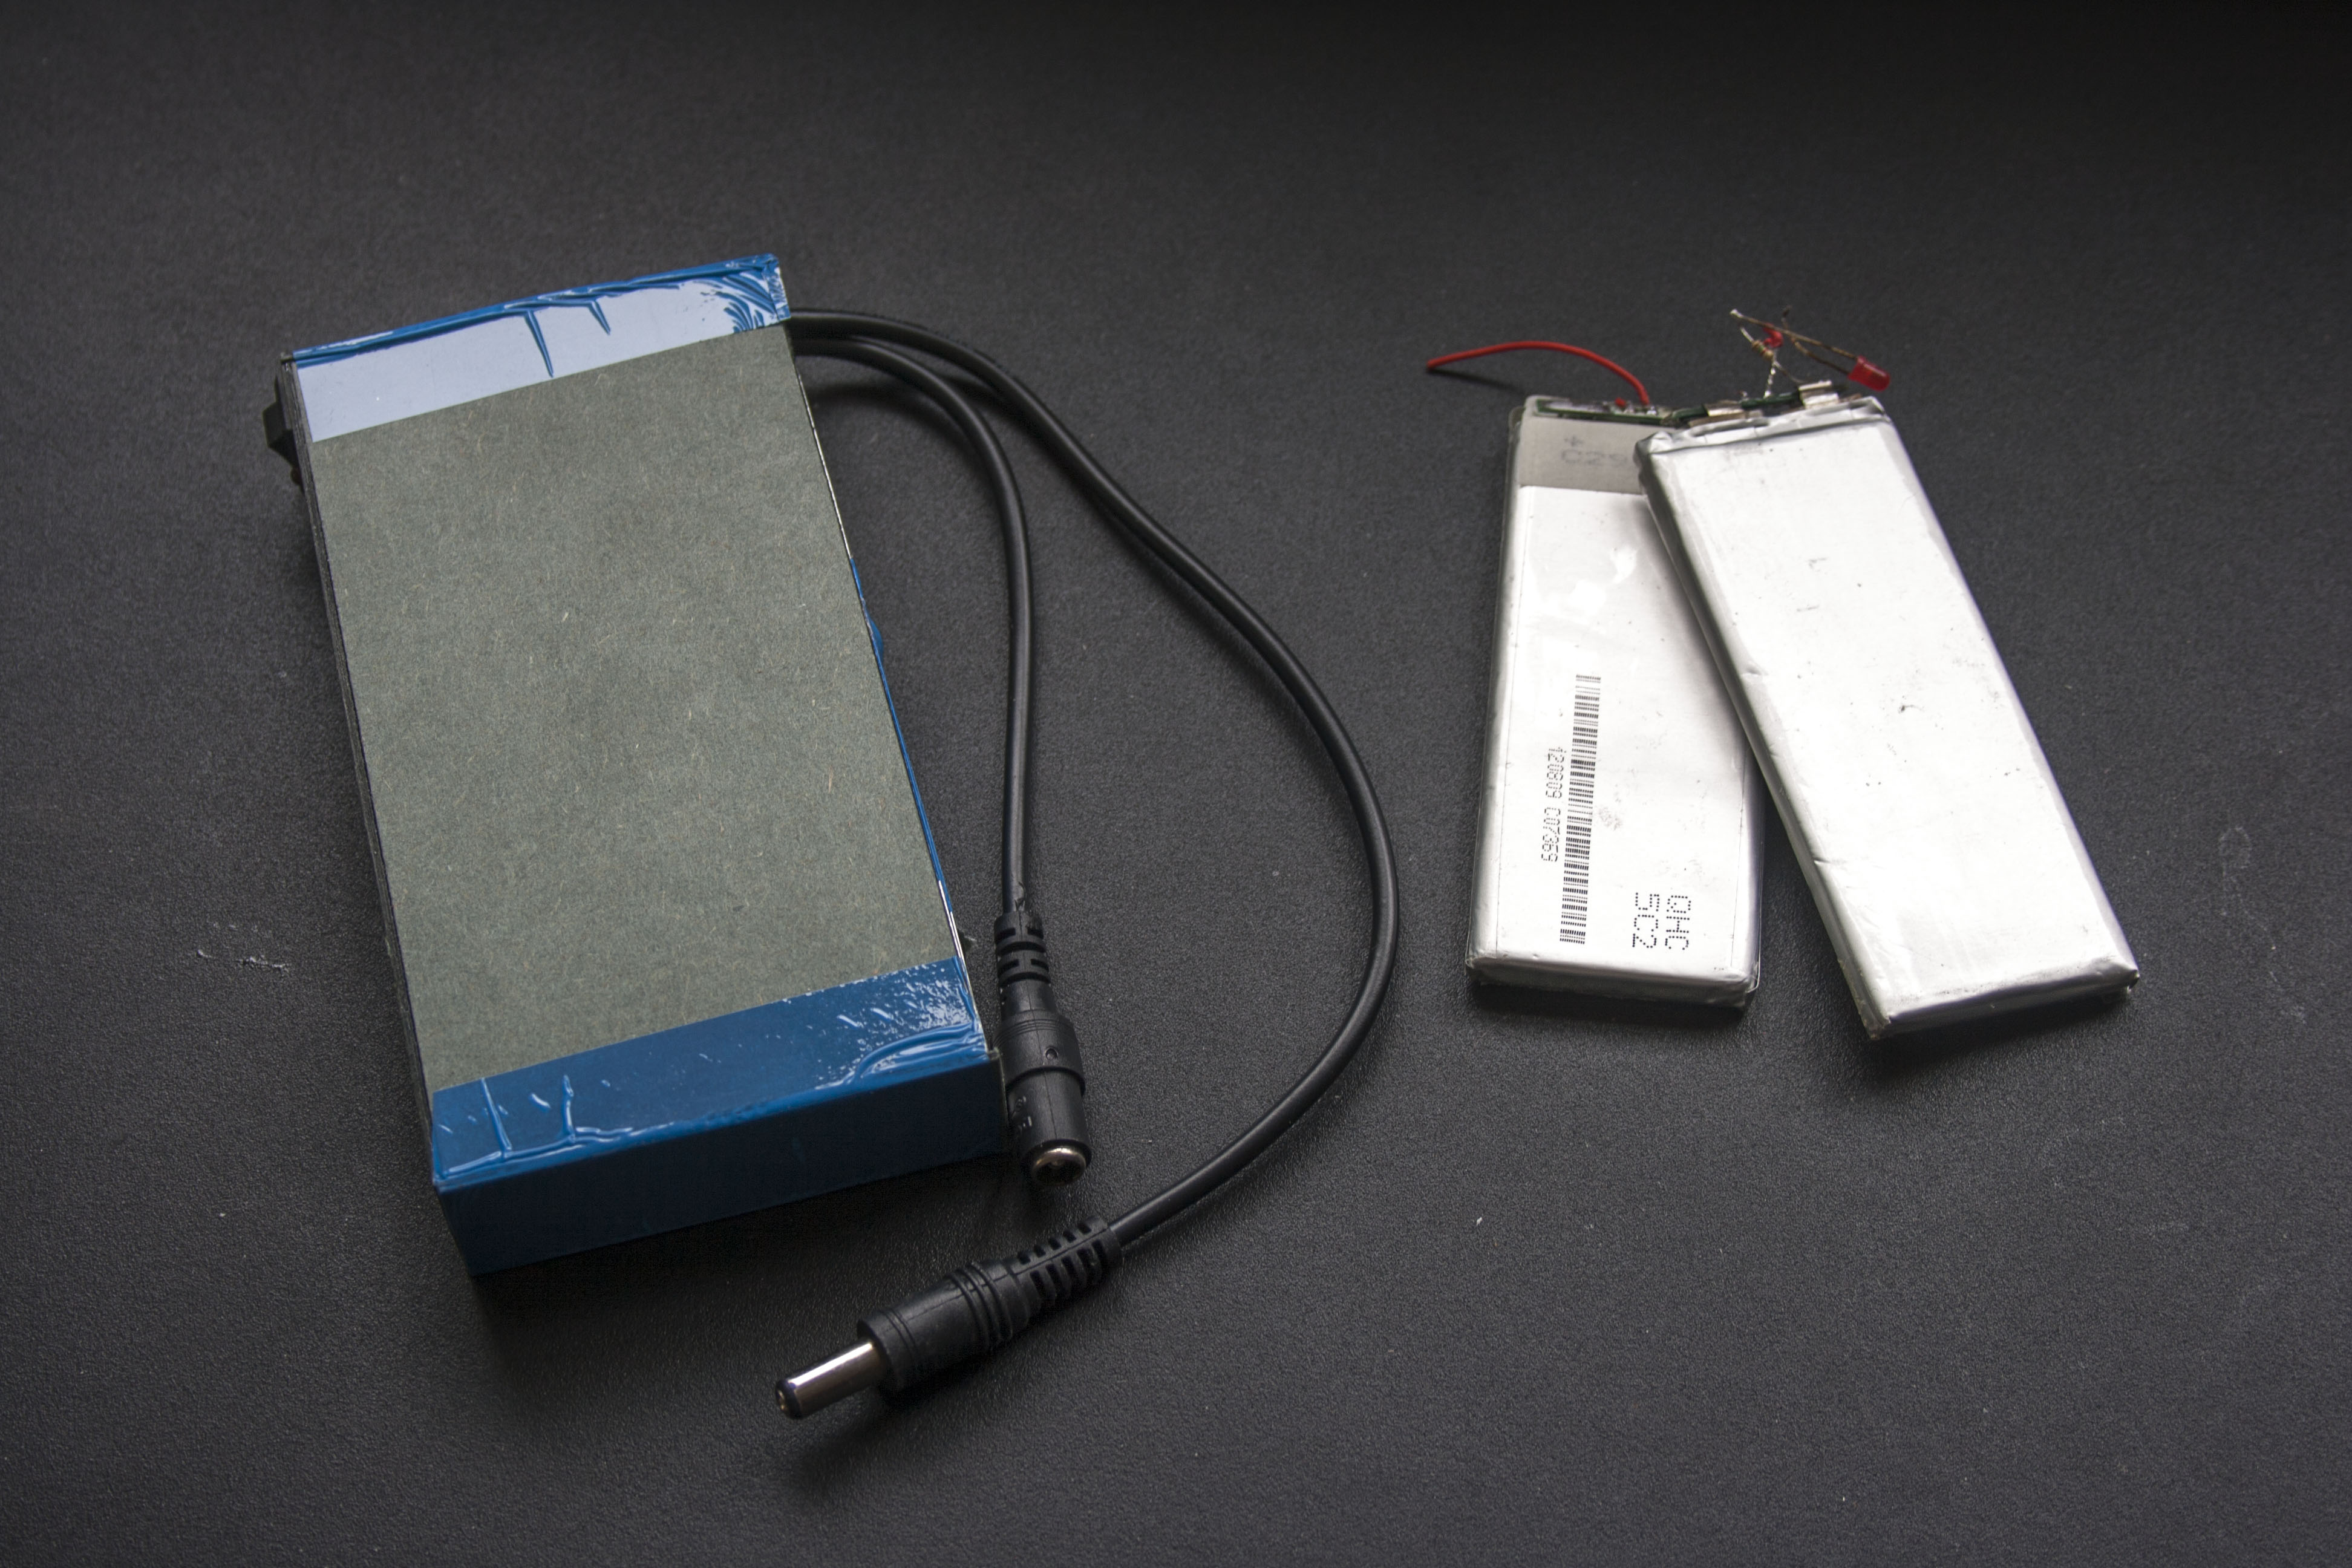
There is one problem with power banks though, and that is that there are a LOT of super cheap ones out there that are made in China that have fake specs, and use recycled batteries.  Recycled lithium batteries are bad news.  Friends of mine have had multiple packs die on them, and in pulling them apart and testing them I’ve found that one or more of the three pouch cells in the batteries they bought were dead, and that the batteries were manufactured five years ago, and that the 9800mAh power banks they were sold were actually more like 3600mah.  I also know of one individual who had one of these cheap battery packs spontaneously catch fire.

IMG_3614
A cheap battery pack made in China using old recycled batteries, with two pouch cells of the type it contains sitting next to it. Typically wrapped in blue tape, though sometimes they come in black plastic enclosures that are nearly indistinguishable from the real deal until you hold it in your hands and find it weighs next to nothing and the power switch is loose. These batteries also often come with chargers that put out far too little current resulting in the batteries taking days to charge instead of hours. If your charger says 150-250mA output instead of 1A then it’s too small! But whatever you do, don’t swap your charger for an ordinary power brick to try charging faster! They look the same, but only one labeled “li-ion charger 12.6V” has the circuitry to safely charge the battery to the correct voltage and limit the current properly!

So how can you avoid getting one of these bad recycled batteries?  Good question!  You could avoid them buy buying one of the expensive name brand power banks on Amazon, but who wants to spend $65 on a battery just because it says Energizer on the front and has a fancy enclosure you’ll never see inside the proton pack?

Thankfully, I’ve done the legwork for you!  At least for those of you in the USA or who can purchase from Amazon.  If you’re outside the US  you can try to find the same manufacturer, but don’t assume that just because a battery on ebay has a black case like this, that it’s good.  There are a lot of fakes built just as badly as the blue bricks above.


IMG_3612

Here’s the link to purchase this battery in the US:

http://www.amazon.com/Talentcell-Rechargeable-6000mAh-Battery-Portable/dp/B00MF70BPU

And if you’re overseas, you can find a similar Talentcell battery here, with added USB port:

http://www.storkz.com/talentcell-yb1206000usb.html?currency=GBP&country=GB&gclid=EAIaIQobChMIuIyxqoWE1gIVLJPtCh3j5gOWEAQYBCABEgK0TvD_BwE

(Ignore the appearance of the LEDs on the battery at the storkz link. The photo is incorrect.)

How do I know this is a good battery?  I disassembled it!

IMG_3605 IMG_3606IMG_3607

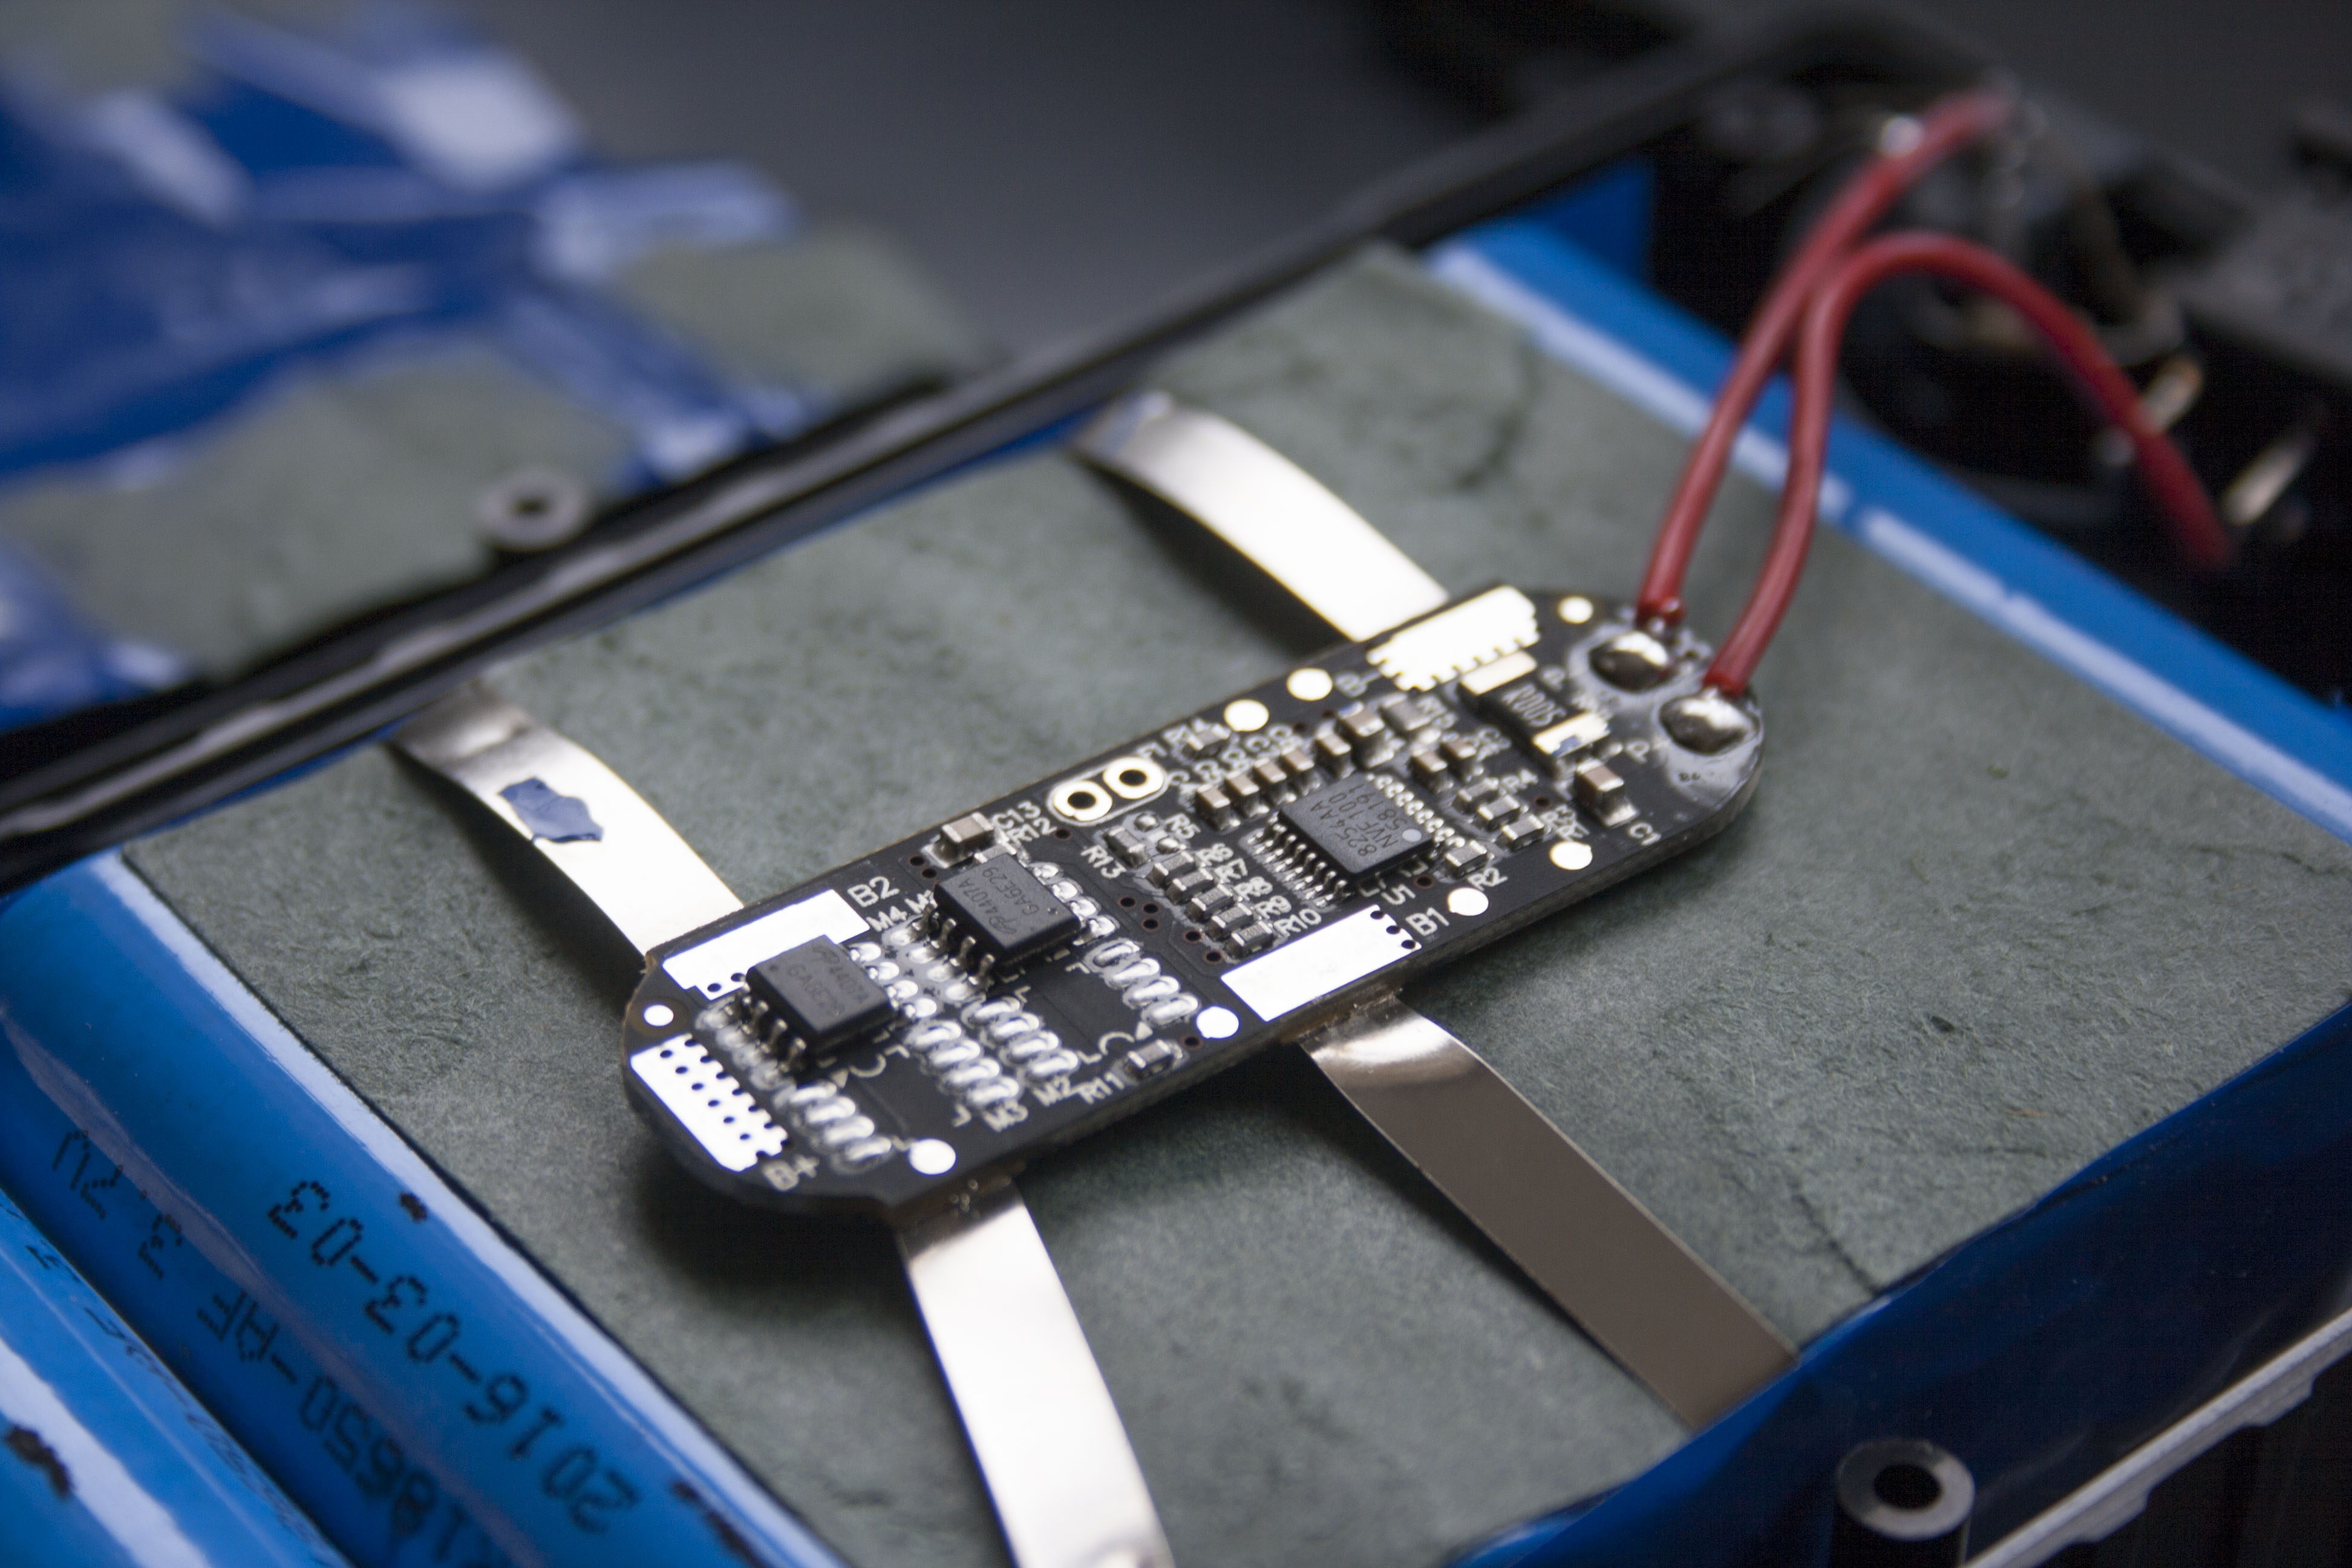
You can see this battery is well built!  Thick metal tabs connect the over current/discharge protection + balance charging circuit to the batteries, and the circuit itself looks to be of very high quality construction.  And unlike the blue brick, this power bank uses cylindrical cells instead of pouch cells.  These 18650 cells are very common, and have some safety features that the lighter more compact pouch cells don’t.  I personally have not heard of these type of cells swelling up or catching fire.  Also, check out that date code: 2016-03-03.  March 3rd of this year!  These batteries were made only two months ago!  No recycled crap here.

Unfortunately I can’t tell by the numbers on the cell what its capacity is, so there’s no way to know if I was cheated on that, but based on the number of cells and the minimum capacity you can get these cells in, there should be at least 4800mAh in there, and based on how long the pack took to charge with the 1A charger they supplied, the advertised 6000mAh is probably accurate.

This power bank unlike the blue batteries doesn’t have two cables coming out of it, but it does come with a Y adapter cable that serves the same purpose:

IMG_3612

And here you can see how you would connect the charge port and power switch harnesses for the proton pack kit to the battery:

IMG_3613

Finally, if you must order a battery from ebay, then I would look for one with screws on the back like this one.  Screws on the back means they aren’t trying to hide what’s inside.  And it means you can check to see what’s inside.  You could also ask the person selling the pack if it contains 18650 or pouch cells and if they are new.  Pouch cells aren’t necessarily bad if you know you’re getting new ones.  I just suggest trying to avoid them because it seems like all the fake batteries use those because those are what are found in most used cellphones and laptops and other used electronic devices.  The 18650 cells are most often used in power tools, and nobody throws those  out until they’re good and dead.

Update 10/20/2017:

The battery at the Amazon link above now looks slightly different, with LEDs on the front to indicate the charge level. I have not done a full teardown of this new version, but I purchased one and on quick inspection it seems to have the same heft and build quality as the original, so I still recommend it! The battery at the storkz link is this newer model as well, but with the addition of a USB port!

Positron Prototypes!

Fresh off the presses from Macrofab, the prototypes for my Positron Proton Pack Kit arrived this weekend!

IMG_3211 IMG_3225 IMG_3239 IMG_3247 IMG_3268 IMG_3276 IMG_3285 IMG_3292 IMG_3308 IMG_3315 IMG_3338 IMG_3364 IMG_3369 IMG_3405 IMG_3420 IMG_3426 IMG_3439 IMG_3471 IMG_3529 IMG_3538

Video of it in action will be forthcoming, just as soon as I can port all the code from the original kit over to it.   A short video demoing the bargraph and sound should be soon-ish as I’ve already ported that code, but the rest will probably take a couple weeks.

“What speakers do you recommend?”

I often get asked:

“What speakers do you recommend for your Proton Pack kit?”

For my kits,  I recommend one or two 4 ohm car speakers wired in parallel.  Each 4 ohm speaker will output 20W,  and the amplifier in my kit can deliver 40W in total.

http://www.parts-express.com/cat/dash-door-deck-car-speakers/390

If you use 8 ohm speakers, or wire your 4 ohm speakers in series, they will each output half the power and your volume will be halved, and you would be adding extra weight for nothing.

There is typically room in the pack under the cyclotron for a 6.5″ or 6×9″ speaker, and by the powercell there is room for a 4″ speaker.  A 5.25″ speaker may fit near the powercell however if you face it towards the motherboard, but in this case it would be wise to drill some holes or install a grille to allow the sound to escape.

Other considerations:

  • A bigger speaker = louder + more bass, but also more weight.  6×9″ speakers are MUCH heavier than 6.5″ speakers.
  • Every 3db increased sensitivity = double the volume!
  • A wide frequency response is desirable, and 2-3 way speakers for cars come with a built in tweeter or two which makes them ideal.

As for specific recommendations, I used to recommend the Pyle Blue label, as they are low in cost and are among the highest in sensitivity, but the ironically named Phantom Boss Ghost series in the same price range appear to be slightly better.

The Boss Phantom Skull are also good, and appear to be identical to the Ghost and come in a few sizes the Ghost does not, but they have red LEDs on them that are synchronized to the music. You could paint over the LEDs or cover them in tape, but the most obvious exposed wires leading to them also power the tweeter and the wires that go to the LEDs are tucked in under the tweeter and very hard to get at.

If money is no object, I might try to squeeze a 6.5″ and 5.25″ speaker in there. If money is an object, or weight is an issue a single 6.5″ speaker would be adequate, and you could sell the spare since they’re sold in pairs, or a pair of 5.25″ speakers might be a good choice.  If money and weight are no object, a 6×9″ speaker and 5.25″ speaker would be the loudest. But proton packs are heavy as it is, so a single 6×9″ speaker may be a good compromise for weight and loudness. It’s really up to you.  There is no best option!

Most in the past I believe have gone with a single 6.5″ speaker, and those that want more have been using a 6.5″ and 4″, but I’m not sure the 4″ is really worth it after installing one in my friend’s pack that I use for demos.  I didn’t drill holes in his motherboard for it though.  A properly installed 5.25″ would certainly be an improvement however!

Positron Prototypes Ready for Manufacture!

Finished the last of the design work on the Positron Proton Pack kit today!

positron-318
Positron
thrower-switch-118
Switch Module
thrower-LED-118
LED Module
thrower-extension-118
Extension Module – Connects to CAT5 cable and fits inside thrower handle.
powercell-034
Powercell
bargraph-038
Bargraph
strobe_rgbw-016
RGBW Strobe – Color changing main strobe for both proton pack and trap kits.
strobe_w-019
White Strobe – Used for grille light upgrade and/or n-filter, and can be added to trap kit .
bargraph_trap-038
Trap Kit Bargraph – A variation on the normal bargraph which may or may not feature in the final kit. Only difference is it includes a location for one extra LED.

Positron Strobe

Finished the layout for the color-changing (RGBW ) strobe today:

strobe-rgbw-016

You may be wondering why it has mounting holes.  The mounting holes aren’t there to attach it to the acrylic tube!  They’re there because the same strobe will be featured in the trap kit I will be releasing soon after the proton pack kit, and because I will be modifying this design slightly to create a white version for the super bright grille light.

The Fresh Positron of Bel-Air

Now this is a story all about how my PCB got flipped, turned upside-down!

positron-312

I was putting the finishing touches on the Positron’s layout the other day when I decided to fix something that was nagging me for quite a while.

When I began working on the Positron, I placed the power connector along the bottom of the board near the 5V regulator.  This location made a lot of sense, both from a power distribution standpoint, and because the main power switch, which is attached to the cable, is usually placed towards the bottom of the Proton Pack.

As I progressed with the design however, and I determined where it would be best to place the CAT5 connector for the extension cable and the connector for the speakers relative to the chips that drive them, I realized I had a problem.   Both these connectors ended up at the top of the PCB, but both also connected to things that would be towards the base of the Proton Pack.

In addition, the CAT5 is the heaviest and the least flexible of the cables, so having it exit to the north and then do a u-turn to head south wasn’t ideal for a variety of reasons.

It was at this point in my thought process that I realized when people went to install the kit  they were either going to mount the board upside down or sideways in order to better orient the CAT5 and speaker cables.

That would make it hard to read the stencils, but even worse,  it would mean the power connector would be oriented towards the top of the pack, opposite the direction in which it needed to go to head towards the power switch at the base.

Thankfully, when increasing the size of the bulk capacitors I had to increase the size of the board, and this extra space enabled me to shift them to the top of the board and place the power connector alongside the speaker connector!

Long story short, I decided that it would be best if I rotated the board 180 degrees, flipped the stencils, and mounted the power connector on the bottom alongside the speaker and CAT5 connectors.


Positron Switch Harness + Charge Port Cable

IMG_2603

Power switch harness and charge port cable add-on for the Positron Proton Pack Kit.

Designed to be used with the 12V rechargeable LiPo battery packs you can find on ebay.

No soldering required!

Switch harness is 6′ long with the switch mounted in the center.  Charge cable is 3′ long. 

Arcoelectric toggle switch is extremely rugged, and attached to the cable with quick connects.

Positron Layout

Thought you guys would like to see the latest and near-final layout for the Positron’s PCB!

positron-260
Final Positron PCB Design

As you can see, a lot has changed since the first prototype:

layout2
First Positron Prototype

Among other changes, the audio system has been overhauled, with a dedicated high PSRR regulator for the DAC to keep noise in the system to an absolute minimum.

In layman’s terms, a Digital to Analog Converter converts digital data to an analog  audio signal for the amplifier.  And that DAC is supplied with 5V from a linear regulator from the 12-14.4V primary supply.  This regulator has a high Power Supply Rejection Ratio which means that any voltage swings on the 12V supply will be reduced by a factor of 100 before reaching the audio system.

You may also have noticed the board has increased in size.  The original was 2.25×1.5″.   The final board will be 2.5×1.75″.   I needed the extra room for the Cat5 cable connector, but that allowed me room to improve the routing, increase the size of the bulk capacitors, and add a dedicated connector for the volume control.  I also beefed up the power connector slightly.

The I2C connector pictured above is where you will connect the Flat Flex Cable for the powercell (or bargraph on the eventual trap kit).  Directly above it is the Cat5 cable connector which goes to the thrower and the modules in there.

The SPI connector in the center won’t be populated, it’s for future expansion.  In the trap kit, it will be used to drive a color changing strobe if desired.  The ISP and TX/RX connectors also will not be populated, they are for programming and debugging.  I am undecided if ports 1-6 will be populated.  They are for switches and I currently have no plans for any feature which would require adding switches to the pack itself.  All the switches for controlling things will be in the thrower, aside from the main power switch, and optionally, the volume pot.

Ports 8-12 will be populated of course, with their primary purpose being triggering the relays on a fog machine upgrade.  They will also trigger when different weapons are activated.

While I’m listing features,  I may as well mention just in case you’re unaware that there’s a 20+20W amplifier on board which is capable of driving 40W total into two speakers with a 12V supply.  That’s 4x what other kits can supply, and it’s as loud as the Lepai amplifiers that were often used with my previous kit.  The smaller Dayton amplifiers that were also often used with my old kits were 15+15W.